
Regularly running a Quality Control (QC) on your Filament Maker using 3devo's standard PLA pellets is excellent practice. This ensures your extruder's performance is still up to standards.
Download the full guide in PDF format, or read through the article below.
Overview |
|
|
|
Regular Quality Checks are part of our Maintenance Guide, so please make sure you read this full procedure first. Whether you have just performed a high level purge after an extrusion incident or you have been experimenting for a month without any major issues, it is recommend to check the performance of the Filament Maker regularly. |
Tools required
Parts required
|
|
|
||
Step 1: Purge the machine with Devoclean MidTemp
It is highly recommended to perform these operations when the machine is purged and filled with Devoclean MidTemp material or when PLA material is still inside the system. If the nozzle is clogged and unable to be purged with Devoclean MidTemp, removing the nozzle might be more difficult due to higher melting temperatures.
Note:
Detailed purging instructions for the Filament Maker can be found here.
Step 2: PLA QC procedure
- Boot up the Filament Maker and connect it to the PC with the USB cable provided and start a datalog with the DevoVision app.
- Set the temperatures of all heaters to 200°C and set the screw speed to 10RPM.
- Use a piece of cardboard to protect the sensor and ensure extruded material can flow freely.
- Start the extruding the remaining Devoclean MidTemp from the extruder, until the hopper is completely empty.
- Feed 1kg of PLA (standard pellets from 3devo) to the hopper.
- Extrude for 20min to transition completely from Devoclean MidTemp to PLA, which should flow clearly out of the nozzle.
- Load PLA presets (1.75mm or 2.85mm - as you wish) from "Main menu" / "Material presets"
- You may need to adjust the fan cooling, depending on your room temperature (starting with 50%)
- Extrude for approximately 30min (all parameters should now be stable).
- Remove the piece of cardboard.
- Place the filament in the puller.
- Wait until the pulling process stabilizes (5min should be more than enough).
- Start spooling the material by utilizing the "start spooling wizard".
- Spool approximately 30 minutes of extruded PLA material onto the spool.
- Stop the process (PLA is safe to stay in the extruder, no purging required).
- Optional: in order to work with other materials again next time, you can transition to Devoclean MidTemp EZ at 200°C, and have access to the 200-300°C range from there.
Step 3: Analyzing the datalog
There are 3 easy indicators to look at in the datalog that you have just recorded.
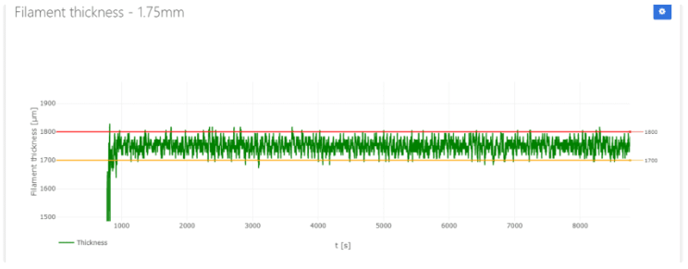
3.1 Filament thickness
Assuming the filament thickness is set on 1.75mm, and there are no pulling issues, you should achieve a +/- 50 microns tolerance with the default PLA and PLA presets.
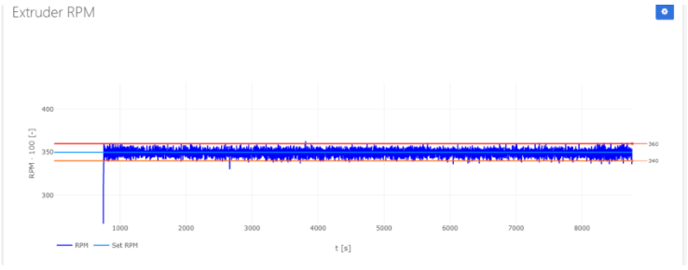
3.2 Screw speed (RPM)
Setting a screw speed on 3.5RPM, a fluctuation of +/- 0.1RPM is acceptable.
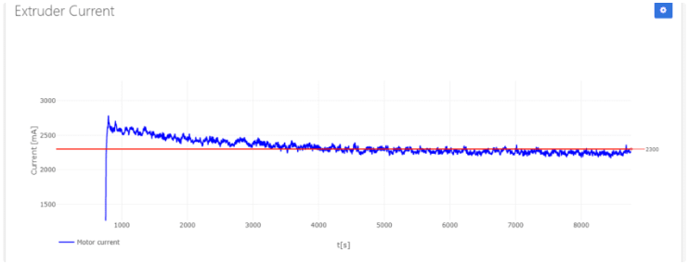
3.3 Motor current
This value is a bit more dependent on the way PLA flows, which is affected by how much moisture it contains.
A motor current without any big spikes, around 2000mA, indicates that the motor is functioning normally.
Conclusion
If the datalog shows results similar as above, your machine is in perfect condition.
If you are unsure about the data retrieved from the PLA QC procedure, please contact us and share the datalog.