
Note:
This article serves as an update to previous experiments extruding recycled PET.
It also includes and expands on some of the information featured in our recycled PET video.
The challenge
PET is very sensitive to temperature changes, and can easily become too liquid or too hard. It is also extremely likely to solidify in the nozzle, even if partially. Therefore being aware of the temperatures affecting the material and the filament is crucial.
Troubleshooting
Drying
On top of the issues with temperature, PET is also hydroscopic. This means it absorbs moisture from the air surrounding it. It needs to be thoroughly dried at least for 4 hours at a range of 140-160℃.
Heating
As already mentioned, managing the temperature of the heaters is essential. Heater 1 (H1) is especially difficult to manage as you want the PET to be hot enough to extrude smoothly with a good flow, but not too hot as that will turn liquid too fast.
When finetuning temperatures with other materials, we usually suggest ±5℃. With PET, this should be even more delicate, so we recommend changing the Heater settings by only 2 or 3℃.
Cooling
As soon as the hot filament is coming out, you want the PET to be cool enough to set.
The metal magnetic plate must be in place. This allows for further insulation built into the system. Removing it will leave the nozzle unprotected from additional unnecessary cooling.
The cooling fans need to be A.) symmetric so they do not cause filament winding, and B.) pointing below the nozzle. If they are aimed too high, they will most likely cause the nozzle to cool and cause more blockage or clumping.
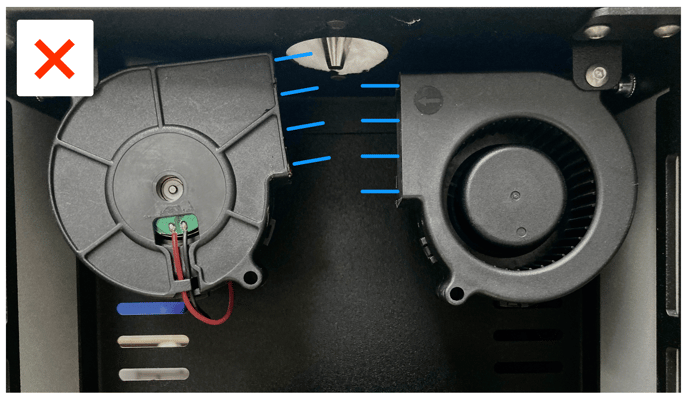 Incorrect: the metal cover is missing, the cooling fans are asymmetric and blowing air on the nozzle.
 Correct: the metal cover is in place, the cooling fans are symmetric and blowing air on the filament path.
Pressure
This becomes an issue especially when using recycled PET or PET that is shredded or in powder form. In the 3devo video, we recommend using two methods to make sure the pressure remains in the barrel.
High-tech method: use a Feeder to help with feeding flow and avoid ratholing or bridging
Not-so-high-tech method: use a rectangular-ended wooden stick to push down on the material into the hopper, helping with extra pressure
2.85mm
Achieving this diameter is tricky for all the reasons above. Essentially you want more pressure, and more flow, which will provide more substance for a thicker diameter. But you also have to combine this with the right amount of heating so the plastic doesn’t become too liquid.
RPM: This can be adjusted little by little, with changes as small as ±0.5RPM. Please make sure the Screw RPM stays within the range of 3 to 7 RPMs.
Note:
There are three different nozzle sizes. The most commonly used one is 4mm. This is what you need to achieve a 2.85mm diameter. A 3mm or 2mm nozzle will not work.
If you're unsure what size nozzle you have, check the internal diameter of the nozzle with a caliper. You can do this while it is attached to the machine; no need to remove the nozzle.
To sum up
Before you start:
- make sure PET is thoroughly dried for at least 4 hours at 140-160℃
- check that you're using a 4mm nozzle, if aiming for 2.85mm diameter
- check that the magnetic plate is in place
During the extrusion:
- cooling fans need to be symmetrically pointing at the filament
- cooling fans should not be blowing wind on the nozzle
- add pressure with the use of a Feeder or a rectangular stick
Finetuning:
- change Heater settings by ±2-3℃ only
- change RPM settings by ±0.5℃ within the range of 3-7 RPM
Helpful reminders:
Every time a setting is changed, no matter how small, there is at least a 5-10 minute waiting time to see how it affects the process.
It’s a (difficult) process and will most likely take multiple sessions to achieve the intended result.
The presets, videos, and articles on PET extrusion results worked for us, in our 3devo environment and it also wasn’t easy. Experiment to see how this same process will work for you, in your context.
Always run a Standard Purge after a PET session using DevoClean MT.