
If it is your first time turning on the machine, please get started with our Onboarding Guide first, to get the most out of your 3devo equipment!
If you need any assistance of questions, please Contact Support!
Introduction
This recommended guide details the actions and steps that material experts at 3devo carry out as common practice.
Below is a video that condenses the information in a neat format.
For those who like reading, carry on...
The following formatting is to help you easily follow the many steps and sub-steps. There is also a cheatsheet of all actionable steps at the bottom of the page.
1. Phase
a) Focus
Actionable Step(s)
Context and explanation
Table of Contents
Material Selection
Pre-processing
1. Start
2. Flow
3. Finetuning
4. Spooling
5. Cleaning
Review (optional)
3D Print (optional)
PRE
PRE meaning pre-extrusion is everything needed to prepare for an extrusion run. Choosing and preparing the right material which might include research, shredding or drying, too. This can happen a day or days before the run.
Material Selection
Choose the Processing Material.
Our dedicated Material Selection article includes extensive details on what you need to consider when choosing.
Pre-processing
Shredding
Shred the Processing Material (optional).
This is optional and is usually needed when processing recycled materials.
Drying
Dry the Processing Material.
Almost all polymers are hygroscopic, meaning they absorb moisture from the air around them. Moisture affects the extrusion in unpredictable ways causing changes in filament quality (bubbles, cutting, diameter issues) and maybe even degradation.
Because of this, drying is essential and should be done right before the extrusion run. Make sure you know the drying details from the material’s Technical Data Sheet (TDS).
Support: TDS is incredibly useful when contacting Support.
RUN
The section contains everything that happens during the extrusion experiment, which usually spreads out over a few continuous hours. This is where we use the FM machine to turn material into spooled filament.
1. Start
The focus in this first phase is to set the right expectations, prepare the workstation, and begin the extrusion run.
a) Plan
Have a plan for your extrusion run.
This usually starts with noting down what we hope to accomplish from the run. Most of the time the goal is printable filament. However, material testing, material research, or practicing on the machine are also realistic goals.
b) Starting Settings
Decide on the starting settings for your Processing Material.
The starting settings will help establish a baseline, which we can then adjust little by little during the Finetuning Phase.
Our recommendations are:
Heaters: all heaters 10% above the Processing Material’s melting temperature.
We’re starting out with a flat base, so that we can find the heater profile later on.
If we start with different settings on each Heater, it will be much more difficult to track the variables.
We’re also starting on the higher end to ensure a decent flow which we can then analyze. If we start lower temperatures then we risk having no flow or even clogging.
Screw: 5 RPM.
From our research and experience, most filaments are processed between 3 to7 RPMs, so setting the screw at 5RPM gives a good baseline which we can later adjust up or down.
Fans: 50% fan cooling and pointing away from the nozzle.
Once again, setting the Fans at the mid-range of 50% ensures we can later increase or decrease it if needed.
We recommend pointing the Fans away so if there is any molten or liquid material coming out, the Fans do not blow it everywhere.
Filament Sensor / Puller Wheel
At this point, we do not need to use the Filament Sensor or the Puller Wheel therefore no settings are needed. These will be more important during the Finetuning Phase.
c) Workstation
Set up workstation.
Since an extrusion run can stretch from a few hours to a full day, it’s important to have everything nearby and prepared. These include:
Filament Maker: in a controlled indoor environment, with an empty spool installed
Processing Material: to turn to filament, pre-processed, dried
Purging Material: to clean or purge the FM with
DevoVision: connected to a laptop/computer, to log data and monitor extrusion
Tools: heatproof gloves, tweezers, pliers, silicon mat or cardboard, vacuum, spoons
Fume Hood (optional): to extract harmful gasses, this will depend on the Processing Material
Feeder (optional): to help feed regrind or powdered materials.
d) Record the process
Start DevoVision log.
Extrusion Report (optional)
At 3devo, we often keep a separate sheet template to note down any observation, obstacles we encounter, or surprising finds. These notes are very helpful in the Post-run phase where we review our results.
e) Start heating
Press “Start extrusion” to start heating.
The machine will heat up first and notify us when the Heaters are at their set temps. The Screw
will not turn yet.
At this point, it is essential to know what material is currently in the machine.
Firstly, the FM is never empty!
The Barrel should always be completely filled with material to ensure its safety (when it is off or on). There are only three materials allowed to be left in the machine when it is off (Screw is not turning):
DevoClean Mid-Temp: our most used purging material
PLA: one of the easier polymers to process
HDPE: often used as transition material
DevoClean High-Temp, or any (even Mid-Temperature range) polymers must not be left in the machine!
f) Start Screw
Press “Start Extrusion” again to start the rotation of the Screw at 5 RPM.
2. Flow
The focus of the second phase is to introduce our Processing Material to the machine and get a decent output flow.
a) Purge (optional)
At this point we can run a Standard or Heavy Purge. This can be to assess how clean the machine is but can also be done independent of an extrusion run. We also recommend a regular PLA Quality Check.
b) Empty Hopper
Empty Hopper out.
Either let the Hopper run low with material or safely spoon or vacuum out whatever is left. The screw should be visible at the bottom of the Hopper.
We recommend this step because mixing materials in the Hopper leads to a lot of issues. Since the materials are always in small sizes (pellets, regrind or powder) they will not transition evenly. Instead, they might mix unevenly or flow upwards.
c) Transition
Add the Processing Material into the Hopper.
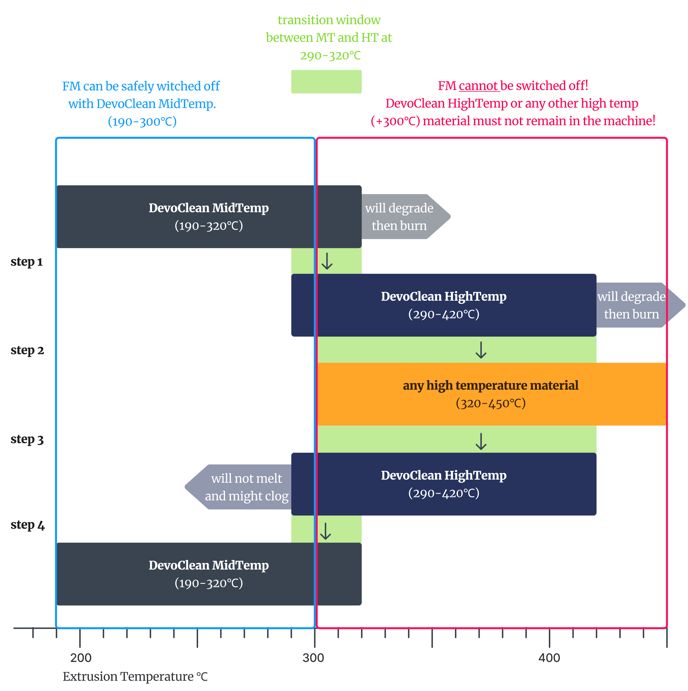
Depending on what material is currently in the machine and what our new Processing Material is we have to consider how to transition from one to the other. We will soon see that the best scenario in most cases is when there is Mid-Temp left in the machine.
It is not wise to use PLA or any other Processing Material to transition. This is because polymers are not great at pushing out material and the melting temperatures between the first and second material might be significantly different. Devo-Clean Mid-Temp is great at pushing out material and has a wide range of tolerance for heat.
Therefore, IF there’s PLA in the machine…
…AND our Processing Material is PLA, then there is no transition needed.
…AND our Processing Material is not PLA, THEN we must transition with Mid-Temp or HDPE.
IF there’s Mid-Temp in the machine…
…AND our Processing Material is under 300C, THEN we can introduce the Processing Material.
IF there’s Mid-Temp in the machine…
…AND our Processing Material is above 300 C, then we must use DevoClean High-Temp as an extra transition step between temperatures.
This is why processing high-temp materials and carrying out a Heavy Purge increases complexity as well as increased risk. The order of materials in the machine will then be:
- DevoClean Mid-Temp (material left in the machine)
- DevoClean High-Temp (transition material to higher temperatures, above 300C)
- Processing Material (in high temp range, for example PEEK or PEKK)
- DevoClean High-Temp (Heavy Purge machine after extrusion run)
- DevoClean Mid-Temp (Standard Purge and transition to lower temperatures, leave in machine)
d) Wait
Wait for full transition.
Once we have introduced our Processing Material to the Hopper, we have to wait until it fully transitions. Our best method is monitoring the output. We want fully melted Processing Material coming out without any evidence of Mid-Temp (full white pellets, foamy blobs etc).
e) Good Flow
Monitor output until there's good flow.
Now that our Processing Material is extruding, we want a good flow. This is why the baseline temperatures are set on the higher end.
3. Finetuning
Once we have our Processing Material in the machine and have established a good flow, we can continue to finetune the parameters. This is potentially the phase that requires the most active analysis and patience.
From this point onwards all three aspects of the process have to work together and inform one another.
1. Machine: the machine settings or the parameters that we can use to control the output.
2. Material: the output, soon to be filament.
3. DevoVision: the data on what is happening inside the machine, as well as checking the diameter.
We will make adjustments to the Machine settings based on both the visual of the Material filament, as well as data from DevoVision.
Only change 1 setting at any given time.
Monitor that change as it takes place in the Machine, how DevoVision logs it, and how it affects the Material. (Heaters can count as 1 setting, but you may choose to change only 1 Heater at a time, rather than all 4.)
Hypothetical example:
The RPM and the motor current graphs show spikes (DevoVision) which might mean that there are larger, unmelted clumps (Material) in the barrel, therefore you may decide to turn the heaters up (Machine) to melt the material more.
a) Sweet-spot
Find the optimal melting temperatures.
The Starting Settings for the Processing Material has already been set and the material has a
good flow. Since we set the Heaters on the higher end, we can then slowly decrease the Heater temperatures bit by bit.
Decrease all Heaters by 5-10C and wait 10-20 minutes.
We wait for several reasons. The Heaters have to reach their new decreased temperatures, the material has to adjust to those lower temperatures, and it also has to travel through the barrel from Hopper to Nozzle.
Repeat. Wait. Observe. Repeat.
We continue finetuning until we’re happy with the quality of the output and it is beginning to look like filament. No bubbles, no discoloration, no lumps or unmelted particles. The general rule is the output should visually look similar to the input.
This often takes up a fair amount of time, but jumping ahead, or changing too many parameters too fast will set us back 2-3 steps. This might cost us more time and more material.
The aim is to systematically adjust the Heaters and find the correct temperature profile for our Processing Material. You can read more in our Heaters Essentials.
b) Fans
Point Fans towards output.
We are ready to cool the filament and get it solid enough to be able to run it through the Filament Sensor, without the Puller Wheels flattening it. Find out more about cooling in our Fans Essentials.
If we had a silicon mat or cardboard below the fans, we can now remove it.
c) Manual
Thread filament through Sensor with Puller Wheels on manual.
This means setting the Puller Wheels on high manual. We recommend starting with 1500 ticks.
“Main Menu > Speed Tuning > Puller Speed > 1500 ticks”
Once again, this will help set a baseline for the Puller Wheels, which we can then adjust once we’re happy with the quality and size of the filament. More of the theory is explained in the Puller Essentials.
We can also start to actively monitor the filament diameter in DevoVision. It will not be perfect in the beginning but the aim is to get a consistent diameter even if it is not in our set range (1.75mm or 2.85mm). Read more about it in our Sensor Essentials.
Then we can continue to finetune the parameters with our Heater, Screw, and Fan settings.
d) Automatic
Change Puller Wheels to automatic.
If all the visual evidence, the settings, and DevoVision indicate that our output is of filament quality, we can change the Puller Wheels to automatic to ensure its stability. This will get it ready for the Spooling Phase.
e) Stability
Double check filament consistency.
We will spend an extra 10-20 minutes ensuring that the stability on the filament is consistent on both DevoVision graph and in the output. Then start spooling.
4. Spooling
The focus here is to create a neat spool of filament that will not cause any issues during 3D printing.
a) Spooling wizard
Start Spooling following the steps of the spooling wizard.
The set dimensions correspond to our spools from 3devo. The Spooling wizard is intuitive and helpful, and our How to Make a Perfect Spool article details instructions, too, with clear photos.
b) Monitor
Don’t disturb the process. Check on it at least every 20 minutes.
Close the door and monitor the spooling process. In rare cases closing the door will result in temperature or cooling fluctuations for the filament, so if we notice any issues, we will just keep the door open.
If the spool is full or we would like to stop the process, we can just press “Stop Spooling”, and cut the filament.
5. Cleaning
Naturally, the focus here is to clean the machine and switch it off in a state that we can easily and safely use it again without running into any problems.
a) Purge
Purge the Processing Material out using the correct purge!
Again, our purging options will depend on the material we are processing. We have a whole section dedicated to this so please explore it separately and sufficiently.
In general, IF our Processing Material is…
…PLA, THEN we can leave it in the machine.
…under 300C, THEN we do a Standard Purge.
…above 300C, THEN we do a Heavy Purge, AND immediately follow it with a Standard Purge.
Purging after every run is essential!
We cannot emphasize this enough! There is nothing worse than spending 2 weeks trying to improve your filament quality, only to realize all the results are unreliable because a purge was skipped or carried out inefficiently. The damage caused by skipping a purge or by performing one at the wrong temperatures can be irreversible.
b) Switch off
Switch off the Filament Maker in the right state.
If we’re happy with our purge, then we can go ahead and switch off the machine. We do not have to change any settings or wait for the Heaters to drop down in temperature. If the Heaters are under 300C (with Mid-Temp in the machine) it is fine to switch off the Filament Maker.
c) Save log
Save DevoVision datalog
Keeping track of our extrusion runs helps our further progress and continued success.
POST
This is every optional step that can be considered when reviewing the produced material, as well as planning for the next run. We might want to look over our notes or even do a 3D print test.
Review (optional)
Reviewing the data we collected during our extrusion run can help us understand the process more, and plan for future extrusions and experiments.
This data might include: the DevoVision datalog, the spool of filament, physical samples of the output (from any phase), our Extrusion Report, photos, videos, and any other notes we may have made during the run.
The aim is to get an overview of what exactly went correctly, what went wrong, what can we change in the upcoming extrusion runs, or even what details or knowledge we are still missing.
3D Print (optional)
Since the aim of producing filament is to 3D print, we can go ahead and put it to the test.
Even if the extrusion run wasn’t as successful as we had hoped, or if we did not produce a full spool, we can still select segments or small portions and see how the filament behaves when processed through the printer. It might even give us invaluable information or insight that we otherwise would not have noticed, have we not tested the filament through printing.
To wrap up:
Practice makes perfect. Use our Support Platform resources, carry out own research, keep records of your extrusions, ask for advice, review and discuss results, continue to practice the steps until it becomes natural and intuitive.
When in doubt, Contact Support.
As promised, here are all the phases and actionable steps in a quick cheatsheet.
PRE
Material Selection
Choose the Processing Material.
Pre-processing
Shred the Processing Material (optional).
Dry the Processing Material.
RUN
1. Start
a) Have a plan for your extrusion run.
b) Decide on the starting settings for your Processing Material.
Heaters: all heaters 10% above the Processing Material’s melting temperature.
Screw: 5 RPM.
Fans: 50% fan cooling and pointing away from the nozzle.
c) Set up workstation.
d) Start DevoVision log.
e) Press “Start extrusion” to start heating.
f) Press “Start extrusion” again to start the rotation of the Screw at 5 RPM.
2. Flow
a) Purge (optional)
b) Empty Hopper out.
c) Add the Processing Material into the Hopper.
d) Wait for full transition.
e) Monitor output until there’s good flow.
3. Finetuning
a) Find optimal melting temperatures.
Decrease all Heaters by 5-10C and wait 10-20 minutes.
Repeat. Wait. Observe. Repeat.
b) Point Fans towards output.
c) Thread filament through Sensor with Puller Wheels on manual.
d) Change Puller Wheels to automatic.
e) Double check filament consistency.
4. Spooling
a) Start Spooling following the steps of the spooling wizard.
b) Don’t disturb the process. Check on it at least every 20 minutes.
5. Cleaning
a) Purge the Processing Material out using the correct purge.
b) Switch off Filament Maker in the right state.
c) Save DevoVision datalog.
POST
Review (Optional)
3D Print (Optional)