
Overview
Introduction
Make sure to read about how to install, record data, and customize the details of your DevoVision set up.
You can analyze live data during an experiment, and also review full extrusion run datalogs afterwards.
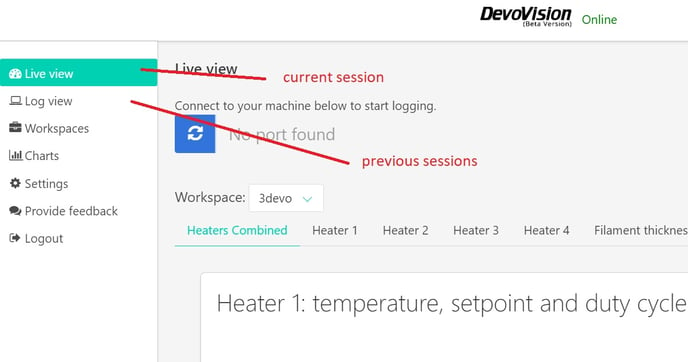
During the extrusion session, you can visualize your log in the "Live view" tab.
You can also access logs from previous sessions in the archive tab called "Log view"'.
Methodology
We recommend all our users to start a datalog every time you start an extrusion run. This is common practice for all 3devo staff as well.
It can help with:
- the quality of the produced filament
- carrying out quality checks
- diagnosing hardware issues
The methodology consists of adjusting parameters and observing how the process reacts. More details about methodology here.
Heaters
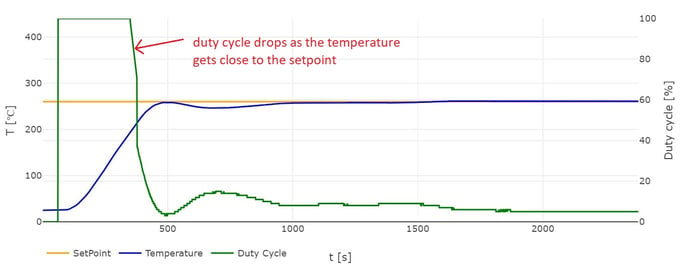
Each Heater gives 3 pieces of data:
- setpoint: target value that you selected in Settings in the FM main menu
- temperature: measured temperature
- duty cycle (dc): indicates the activity percentage of the Heater. The duty cycle percentage decreases when the temperature increases toward the setpoint, thanks to a control loop
Note
After adjusting the setpoint on one Heater, please wait for at least 20 minutes before changing the setpoint again.
RPM
Summarized
3.5 - 7.0RPM is often the best window for most extrusions.
Fluctuations of +/- 0.1RPM are acceptable. Anything larger is cause for concern.
Big fluctuations do not necessarily indicate that your motor is broken, but that the material flow is inconsistent. It is an indicator of stability (or instability) which is linked to the motor current.
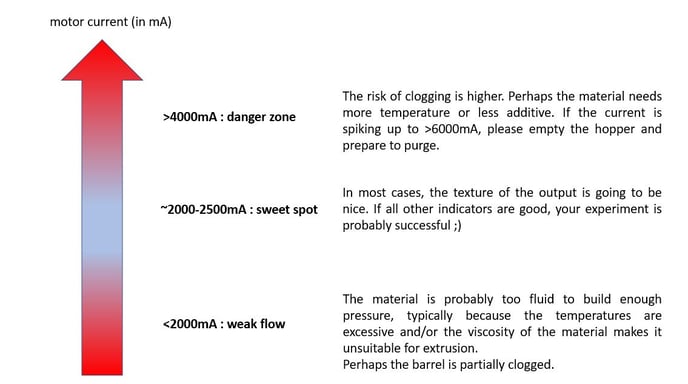
Motor Current
The motor current (MC, Extruder Current) gives an indication of the pressure inside the barrel. The more difficult it is for the screw to rotate, the higher the current. However, this does not mean that you want a current as low as possible. Some pressure is needed for good melting and stable pushing.
![]() Caution
Caution
Safety trigger: the Filament Maker shuts down when the current reaches 9000mA.
Big sudden spikes in the motor current might indicate inconsistent feeding/melting (early melting, heterogeneous particle size (as opposed to homogeneous), etc...).
Filament Thickness
This is the main quality indicator.
The goal is to keep the filament thickness between the tolerance lines. The tolerances are typically measured as +/- 100 micrometers, however each 3d Printer has its own range, and it is important to validate the quality of your filament with the printer you intend to use.
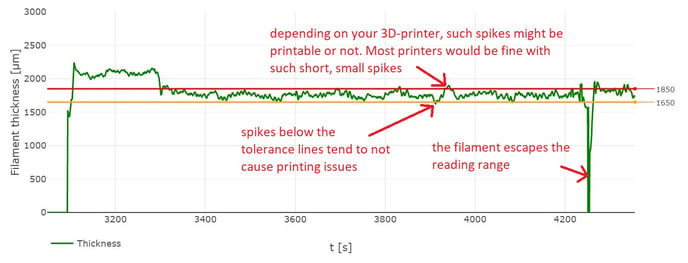
Spikes outside the tolerance lines are a tricky topic. Spikes above the lines are generally more problematic than spikes below the lines. Depending on your printer, spikes of 50/100/150 micrometers might be acceptable or not.
You can assume that you have achieved stable results once the filament thickness consistently stays between the lines for 30min+. Only then we recommend you to start spooling.
Note
The sensor is responsible for measuring and ensuring that, on average, as long as the filament does not escape the reading range, the thickness corresponds to the setpoint.
However, the fluctuation around that setpoint - or tolerance -, is not the sensor's fault.
The thickness tolerance is connected to 3 keys.
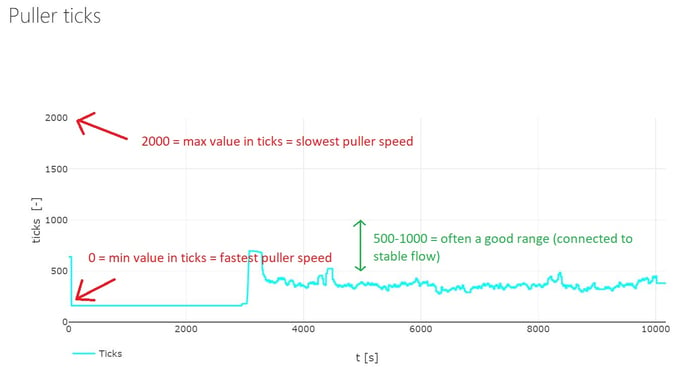
Puller Speed
This is connected to the filament thickness.
The sensor measures the thickness and automatically adjusts the puller speed.
Puller speed control loop
- Thickness is measured every second
- Thickness average is calculated over 20s
- If the average differs from the setpoint (eg 1.75mm), the calculator automatically adjusts the puller speed
- Repeat
This system works well if the pressure/flow is stable inside the barrel. In that case, the puller will find a cruising speed after 1-2min, ensuring a tight tolerance.
If the pressure/flow is not consistent (due to melting issues, excessive fluidity,....), the puller will not be able to keep the thickness without a tight tolerance. This does not mean that the sensor is malfunctioning.
The Puller Wheel helps maintain a consistent filament diameter IF the filament is already of good quality with consistent pressure, flow, and cooling. You can read more about it in our Puller Essentials.
Remember to pair everything you know about DevoVision with the Practice methodology.